The first step i had to do when i was producing my continuity exercise was uploading footage. I had to upload the footage be able to start the editing. When i was uploading the footage i had to upload it in small sections to be able to edit each part of the video .

When I wanted to import my footage of my video I had to go to file and to capture project. Once I started to capture project it captured the advert in different parts which would make it easier for me to edit. After the footage was uploaded I organised it in to order of what events happened which would help me be able to edit each part separately. Also when editing my video I used a different range of editing tools. The tools that I used mainly was;
1. Razor blade tool- this allowed me to cut parts of the footage into different parts of the advert, this also allowed me to make sure that the advert was cut within the right place.
2. Pen tool- the pen tool this allowed me to add the effect of fading in and out pictures and music.
3. Crop tool – the crop tool allowed me to crop parts of the video this tool was mainly used when I only wanted to crop a small part of the video.
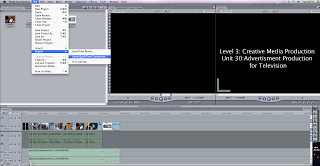
When I was producing my video I had to create text to allow the audience to know the main purpose of what the video was selling. The way I created text was I went to the text button on final cut express then once I clicked that I went on to text then press text once the side bar came up.
Then a box appears that says sample text once that has appeared you press controls then this allows you to write in the text box .Also when creating the text you can change the colour the font and also the way the text moves.


After i added the text in to the video i needed to make sure that the sound of the people speaking was matching the action with in the video. I had to make sure the speaking matched up to the acting line.

The second step I had to do was click options. Once options was clicked a white box would show up with different formats that I could change.


 I had to selct the file that I wanted to upload then wait for it to load. Once it was loaded to youtube I had to make sure that it was under a name that I would easily remember so it could be found quickly. Once it was uploaded I saved it.
I had to change certain settings that needed to be changed was compressor type this needed to be changed to MPEG4 video. Then I had to change the key frames to automatic, and the compressor to medium and finally the date rate to limited 600. Then had to make sure that I pressed okay so it saved the changes on that setting.
The next settings that I had to change was the size settings. I had to changed it o compressor negative then click on the drop down menu and change it to 320x240 QVGA, then click it to make sure it was saved.
The final settings that needed changing was sound settings. I had to sound format to AAC then change the channel to Mono, then had to save the changes.
Finally I had to save the file as something that I would recognize then make sure I pressed saved.
Also with the continuity exercises that I produced I had to upload it to youtube. I had to go onto the inter then go on to youtube once I was on youtube I had to log in to my account then I had to go to upload. Once I have pressed upload this screen will show up, then once the screen below has appeared i needed to press upload.
No comments:
Post a Comment